PowerShellでPING試験をする
最近ツールを導入できない環境での試験が多いのでメモ書き程度に。
実行すると、カレントディレクトリの server.list に書かれたホストへPINGを打って、hoge.csvへ記録していきます。
実行結果はこんな感じになります。
Time                Address       ReplySize ResponseTime ResponseTimeToLive StatusCode
----                -------       --------- ------------ ------------------ ----------
2016/02/11 18:51:58 192.168.100.1        32            0                 64          0
2016/02/11 18:51:58 8.8.8.8              32            6                 51          0
2016/02/11 18:51:58 192.168.200.2                                                11003


Time                Address       ReplySize ResponseTime ResponseTimeToLive StatusCode
----                -------       --------- ------------ ------------------ ----------
2016/02/11 18:52:01 192.168.100.1        32            0                 64          0
2016/02/11 18:52:01 8.8.8.8              32            6                 51          0
2016/02/11 18:52:01 192.168.200.2                                                11003
正常に疎通をしない場合はStatusCodeが0以外を返すはずなので、こんな感じで検索できます。
> Import-Csv hoge.csv | Where-Object { $_.StatusCode -ne 0 } | Format-Table -AutoSize

Time                Address       ReplySize ResponseTime ResponseTimeToLive StatusCode
----                -------       --------- ------------ ------------------ ----------
2016/02/11 18:51:46 192.168.200.2                                           11003
2016/02/11 18:51:49 192.168.200.2                                           11003
2016/02/11 18:51:52 192.168.200.2                                           11003
2016/02/11 18:51:55 192.168.200.2                                           11003
2016/02/11 18:51:58 192.168.200.2                                           11003
2016/02/11 18:52:01 192.168.200.2                                           11003
最近
いい加減記事書かないとね。
AX関連の検索でくる人が多いようだけれど需要あるんだろうか('A`)
Cubieboard2を買った。
Cubieboard2を買った。

特に興味があったわけではないのだけど、先輩が買って楽しそうだったのでつい('A`)
Cubieboard2は手のひらサイズのコンピュータで、AndroidやLinuxが動きます。 似たようなものにRaspberry PIやBeagleBone Blackなんかがありますね。
デュアルコアのCPUにメモリ1GB、ストレージとしては4GBのNAND Flashがついてきます。 SATAのHDD(2.5inch)があれば接続することも可能です。
最初からAndroidがインストールされた状態で出荷されてくるので、HDMIケーブルとACアダプタなんかがあれば遊べます。 パソコンのUSBポートからでも給電はできるので、とりあえずパソコンがあればどうにかなる感じです。
とりあえずNAND FlashにLinuxを入れてこんな感じでマウントさせてみました。 OS標準のコマンドはNAND Flashへ、その他の容量が増えそうな箇所はSSDに入れています。
$ mount
/dev/nandd on / type ext4 (rw)
none on /proc type proc (rw,noexec,nosuid,nodev)
none on /sys type sysfs (rw,noexec,nosuid,nodev)
none on /dev/pts type devpts (rw,noexec,nosuid,gid=5,mode=0620)
none on /sys/fs/fuse/connections type fusectl (rw)
none on /sys/kernel/debug type debugfs (rw)
none on /run type tmpfs (rw,noexec,nosuid,size=10%,mode=0755)
none on /run/lock type tmpfs (rw,noexec,nosuid,nodev,size=5242880)
none on /run/shm type tmpfs (rw,nosuid,nodev)
none on /run/user type tmpfs (rw,noexec,nosuid,nodev,size=104857600,mode=0755)
/dev/sda2 on /mnt/ssd type ext4 (rw)
/mnt/ssd/home on /home type none (rw,bind)
/mnt/ssd/usr on /usr type none (rw,bind)
/mnt/ssd/var on /var type none (rw,bind)
/dev/mmcblk0 on /mnt/microsd type ext4 (rw)
$ df -h
Filesystem      Size  Used Avail Use% Mounted on
/dev/nandd      2.0G  122M  1.8G   7% /
none             98M  212K   98M   1% /run
none            5.0M     0  5.0M   0% /run/lock
none            488M     0  488M   0% /run/shm
none            100M   16K  100M   1% /run/user
/dev/sda2       239G  4.9G  222G   3% /mnt/ssd
/dev/mmcblk0     15G  352M   14G   3% /mnt/microsd
すでにパソコンをがあって、キーボード、マウス、HDMIケーブルを持っている人であればMicroSDと合わせても1万円くらいの出費で済みます。 SATAのディスクもつけたい場合は候補に入れてよさそうです。
AXシリーズの使い方(1)
A10 NetworksのAXシリーズで使う基本的なコマンドについて書いてみます。 前回同様にSoftAXを使います。
一部メッセージが日本語になっていますが、localeをja_JP.UTF-8 か ja_JP.EUC-JP にすると日本語で出力してくれるようです。 とはいえ、ほとんどが英語でたまーに日本語も出てくるくらいです。
バージョンの確認
色々表示されます。 今回使うのは 2.7.0-P2, build 53です。
SoftAX#show version
AX Series Advanced Traffic Manager AXSoftAX
  Copyright 2007-2012 by A10 Networks, Inc.  All A10 Networks products are
  protected by one or more of the following US patents and patents pending:
  7716378, 7675854, 7647635, 7552126, 20090049537, 20080229418, 20080040789,
  20070283429, 20070271598, 20070180101

      64-bit Advanced Core OS (ACOS) version 2.7.0-P2, build 53 (Feb-21-2013,23:27)
        Booted from Hard Disk primary image
      Licenses:  Bandwidth
      Serial Number: N/A
      aFleX version: 2.0.0
      aXAPI version: 2.0, 1.2, 1.1, 1.0
      Hard Disk primary image (default) version 2.7.0-P2, build 53
      Hard Disk secondary image version 2.7.0-P2, build 53
      Last configuration saved at Apr-28-2013, 05:16
      Virtualization type: Hyper-V
      Hardware: 1 CPUs(Stepping 11), Single 7G Hard disk
      Memory 1535 Mbyte, Free Memory 212 Mbyte
      Hardware Manufacturing Code: 11
      Current time is Apr-29-2013, 08:17
      The system has been up 1 day, 12 hours, 44 minutes
CPU使用率を調べる
単純に現在のCPU使用率を確認したいだけならshow cpuで確認できます。
SoftAX#show cpu
Time: 08:19:36 JST 月  4月 29 2013
            1Sec    5Sec    10Sec   30Sec   60Sec
--------------------------------------------------------
Control1      4%      6%      6%      9%      9%
Data1         4%      3%      3%      3%      4%
一定秒数ごとに表示
show cpu intervalを使うと一定秒数ごとに表示してくれます。
SoftAX#show cpu interval 1
Cpu Usage: (press ^C to quit)
            1Sec    5Sec    10Sec   30Sec   60Sec
--------------------------------------------------------
Time: 08:20:26 JST 月  4月 29 2013
Control1      4%      7%     14%     12%     10%
Data1         1%      4%      4%      4%      4%
Time: 08:20:27 JST 月  4月 29 2013
Control1     16%     10%     15%     12%     10%
Data1         3%      4%      4%      4%      4%
Time: 08:20:28 JST 月  4月 29 2013
Control1     18%     10%      9%     12%     10%
Data1         4%      4%      3%      4%      4%
Time: 08:20:29 JST 月  4月 29 2013
Control1      4%      8%      9%     12%     10%
Data1         5%      3%      4%      5%      4%
Time: 08:20:30 JST 月  4月 29 2013
Control1      4%      9%      8%     12%     10%
Data1         7%      4%      4%      5%      4%
グラフ表示
show cpu historyを使うとグラフっぽいので表示されます。 Cisco IOSのshow processes cpu historyとそっくりです。
SoftAX#show cpu history
Time: 08:21:54 JST 月  4月 29 2013

         1  2     211  31    1  4 111    1  1  121 1  23   11 1
   696 990810997841107132677778 1371955961592131122022825854241
100
 90
 80
 70
 60
 50
 40                             *
 30                    *        *                     **
 20         *     *    *     *  * * *           *     **
 10*** **** ***** **** ******** * ***********  *** *  ******* *
   0....0....1....1....2....2....3....3....4....4....5....5....
        5    0    5    0    5    0    5    0    5    0    5
      Control CPU1:   CPU% per second (last 60 seconds)
メモリ使用率を調べる
メモリ使用率を調べるにはshow memoryを使います。
SoftAX#show memory
         Total(KB)  Used       Free       Usage
----------------------------------------------------
Memory:  1535572    1322648    212924     86.1%


System memory:
Object size(byte)    Allocated(#)         Max(#)
----------------------------------------------------------------
4                    0                    0
36                   113                  3639
100                  524                  1926
228                  10                   992
484                  1                    503
996                  72                   253
2020                 1                    127
4068                 24                   63

aFleX memory:
Object size(byte)    Allocated(#)         Max(#)
----------------------------------------------------------------
32                   294                  7278
64                   1216                 3852
128                  1158                 2620
256                  31                   1596
512                  75                   896
1024                 10                   478
2048                 0                    0
4096                 2                    62

SSL memory:
Object size(byte)    Allocated(#)         Max(#)
----------------------------------------------------------------
64                   0                    0
128                  0                    0
320                  0                    0
512                  0                    0
768                  0                    0
1792                 0                    0
4096                 0                    0

TCP memory:
Object size(byte)    Allocated(#)         Max(#)
----------------------------------------------------------------
1104                 2                    225
184                  0                    0
プロセスを調べる
あまり使うことはないと思いますが、show process systemでプロセスの表示ができます。 snmp使えない!!とかなった時とかに使うかも?
SoftAX#show process system
a10mon is running
syslogd is running
a10logd is running
a10timer is running
a10Stat is running
a10hm is running
nsm is running
imi is running
ospfd is running
ospf6d is running
ripd is running
ripngd is running
bgpd is running
isisd is running
lacpd is running
a10snmpd is running
a10gmpd is running
a10wa is running
a10lb is running
プロセスの詳細を表示する
あとは隠しコマンドっぽい感じでshow process system detailというのが用意されています。 ?押しても出てきません。 中ではLinuxが動いているので、それっぽいプロセスも見えますね。
SoftAX#show process system detail
Process name                    state     PID    %CPU   %MEM   VSZ      RSS
---------------------------------------------------------------------------
init [3]                        running   1      0.0    0.0    2612     576
[kthreadd]                      running   2      0.0    0.0    0        0
[migration/0]                   running   3      0.0    0.0    0        0
[ksoftirqd/0]                   running   4      0.0    0.0    0        0
[watchdog/0]                    running   5      0.0    0.0    0        0
[events/0]                      running   6      0.0    0.0    0        0
[khelper]                       running   7      0.0    0.0    0        0
[kblockd/0]                     running   68     0.0    0.0    0        0
[kacpid]                        running   70     0.0    0.0    0        0
[kacpi_notify]                  running   71     0.0    0.0    0        0
[ata/0]                         running   125    0.0    0.0    0        0
[ata_aux]                       running   126    0.0    0.0    0        0
[kjsuspend_usbd]                 running   129    0.0    0.0    0        0
インタフェース関連
show interfacesでインタフェースの情報が取得できます。
SoftAX#show interfaces
  Ethernet 1 is up, line protocol is up
  Hardware is GigabitEthernet, Address is 0015.5d64.ffc8
  Internet address is 0.0.0.0, Subnet mask is 0.0.0.0
  Configured Speed auto, Actual 1Gbit, Configured Duplex auto, Actual fdx
  Member of L2 Vlan 200, Port is Untagged
  Flow Control is disabled, IP MTU is 1500 bytes
  Port as Mirror disabled, Monitoring this Port disabled
  299942 packets input,  41259682 bytes
  Received 0 broadcasts,  Received 0 multicasts,  Received 299942 unicasts
  0 input errors,  0 CRC  0 frame
  0 runts  0 giants
  159574 packets output  12297119 bytes
  Transmitted 0 broadcasts  0 multicasts  159574 unicasts
  0 output errors  0 collisions
  300 second input rate: 2744 bits/sec, 2 packets/sec, 0% utilization
  300 second output rate: 848 bits/sec, 0 packets/sec, 0% utilization
簡易表示
show interfaces briefでCisco IOSでいうshow ip interface briefっぽい表示もできます。
SoftAX#show interfaces brief
Port  Link  Dupl  Speed Trunk Vlan MAC             IP Address          IPs  Name
------------------------------------------------------------------------------------
mgmt  Up    Full  1000  N/A   N/A  0015.5d64.ff01  192.168.100.254/24    1
1     Up    Full  1000  None  200  0015.5d64.ffc8  0.0.0.0/0             0
2     Up    Full  1000  None  100  0015.5d64.ff64  0.0.0.0/0             0
ve100 Up    N/A   N/A   N/A   100  0015.5d64.ff64  192.168.200.254/24    1
ve200 Up    N/A   N/A   N/A   200  0015.5d64.ffc8  192.168.10.254/24     1
統計情報
show interfaces statisticsでインタフェースのパケット数などが見えます。
SoftAX#show interfaces statistics

Eth InPPS          InBPS          OutPPS         OutBPS         Time
--------------------------------------------------------------------------
1   0.99           73.43          0.00           0.00           08:58:28
2   0.99           63.51          0.00           0.00           08:58:28
ARPテーブルの表示
show arpでARPテーブルが見えます。IPアドレスの指定も可能です。
SoftAX#show arp
Total arp entries: 4        Age time: 300 secs
IP Address         MAC Address          Type         Age   Interface    Vlan
---------------------------------------------------------------------------
192.168.10.100     9027.e4fa.d512       Dynamic      209   ve200        200
192.168.100.1      0019.55b9.53ae       Dynamic      3     Management   1
192.168.100.20     001d.7d3e.88fb       Dynamic      138   Management   1
192.168.200.1      0019.55b9.53ae       Dynamic      86    ve100        100
MACアドレステーブルの表示
show mac-address-tableでMACアドレステーブルが見えます。 ポート、VLAN、MACアドレスでのフィルタも可能です。
SoftAX#show mac-address-table
Total active entries: 4     Age time: 300 secs
MAC-Address      Port     Type      Index     Vlan  Age
---------------------------------------------------------
0019.55b9.53b6   2        Dynamic   107       100   0
0019.55b9.53ae   1        Dynamic   398       200   0
9027.e4fa.d512   1        Dynamic   428       200   0
0019.55b9.53ae   2        Dynamic   701       100   50
コンフィグを表示する
show running-configで稼働中のコンフィグ、show startup-configで起動時に読み込まれるコンフィグが表示されます。 Ciscoと一緒ですね。
一部抜き出して表示する
running-configの場合はinterface, slb, vlan, haなどの部分だけ抜き出して表示することも出来ます。
SoftAX#show running-config interfaces
interface management
 ip address 192.168.100.254 255.255.255.0
 ip default-gateway 192.168.100.1
 ip control-apps-use-mgmt-port
 access-list 99 in
 bcast-rate-limit
!
interface ve 100
 ip address 192.168.200.254 255.255.255.0
!
interface ve 200
 ip address 192.168.10.254 255.255.255.0
!
デフォルト値も含めて表示する
show running-config with-defaultで、デフォルト値も含めたコンフィグを表示できます。 基本的にデフォルトの値は表示されないのですが、どうしても確認したい場合に使います。
SoftAX#show running-config with-default
!Current configuration: 6632 bytes
!Configuration last updated at 09:09:28 JST Mon Apr 29 2013
!Configuration last saved at 09:09:31 JST Mon Apr 29 2013
!version 2.7.0-P2, build 53 (Feb-21-2013,23:27)
!
system resource-usage template default
   network-resources
     static-mac-count 500
     static-arp-count 128
     static-neighbor-count 128
     static-ipv4-route-count 4000
     static-ipv6-route-count 4000
   app-resources
     real-server-count 128
     service-group-count 128
     virtual-server-count 64
     health-monitor-count 1024
     gslb-site-count 10
     gslb-device-count 20
     gslb-service-ip-count 100
     gslb-service-port-count 200
     gslb-zone-count 500
     gslb-service-count 1000
     gslb-policy-count 1000
     gslb-ip-list-count 100
     gslb-template-count 100
     gslb-geo-location-count 500000
     gslb-view-count 0
!
hostname SoftAX
!
clock timezone Asia/Tokyo
!
system resource-usage l4-session-count 2097152
system resource-usage nat-pool-addr-count 10
system resource-usage real-server-count 128
....
起動時のコンフィグを確認する
show startup-config allで現在使っているコンフィグの名前や、次回起動時のコンフィグ等が確認できます。
SoftAX#show startup-config all
Current startup-config profile: 2013-04-29
Primary startup-config profile: 2013-04-29
Secondary startup-config profile: Default
Profile-Name                           Size    Time
------------------------------------------------------------
2013-04-29                             2146    2013-04-29  9:32
show startup-config profile のあとにプロファイル名を指定すると、中身も確認することができます。
繰り返してコマンドを実行する
一定間隔でコマンドを実行し続けたい場合はrepeatコマンドを使います。 Ctrl+Cを押すまで止まりません。
SoftAX#repeat 1 show memory system
System Memory Usage:
Total(KB)  Free       Shared     Buffers    Cached     Usage
---------------------------------------------------------------------------
1535572    106876     0          1488       106052     86.1%

Refreshing command every 1 seconds. (press ^C to quit) Elapsed Time: 00:00:00
System Memory Usage:
Total(KB)  Free       Shared     Buffers    Cached     Usage
---------------------------------------------------------------------------
1535572    106876     0          1504       106052     86.1%

Refreshing command every 1 seconds. (press ^C to quit) Elapsed Time: 00:00:01
System Memory Usage:
Total(KB)  Free       Shared     Buffers    Cached     Usage
---------------------------------------------------------------------------
1535572    106876     0          1504       106052     86.1%

Refreshing command every 1 seconds. (press ^C to quit) Elapsed Time: 00:00:02
ログを表示する
show logでログの表示ができます。 一番上が最新のもので下にいくにつれて古くなります。
実際に使う場合は show log length で行数を指定することが多いと思われます。
SoftAX#show log length 10
Log Buffer: 30000
Apr 29 2013 09:47:58 Notice  [SYSTEM]:A cli session for user "admin" from 192.168.10.100 has been opened. Session ID assigned is 1.
Apr 29 2013 09:47:55 Error   [SYSTEM]:The user, admin, from the remote host, 192.168.10.100, failed in the CLI authentication.
Apr 29 2013 09:47:55 Warning [SYSTEM]:Local authentication failed(user: admin): Admin password error
Apr 29 2013 09:47:10 Info    [AX]:Service https on virtual Server virtual-server-01 port 443 is up
Apr 29 2013 09:47:10 Info    [AX]:Service tcp on virtual Server virtual-server-01 port 80 is up
Apr 29 2013 09:46:59 Info    [HMON]:SLB server web-server-01 (192.168.10.100) TCP port 443 of group service-group-web-https is up.
Apr 29 2013 09:46:59 Info    [HMON]:SLB server web-server-01 (192.168.10.100) port 443 is up
Apr 29 2013 09:46:59 Info    [HMON]:SLB server web-server-01 (192.168.10.100) TCP port 80 of group service-group-web is up.
Apr 29 2013 09:46:59 Info    [HMON]:SLB server web-server-01 (192.168.10.100) port 80 is up (HTTP Status Code OK)
Apr 29 2013 09:46:58 Info    [WEB]:Web server started.
テクニカルサポート向けの情報を取得する
show techsupportでサポート向けの情報を表示します。
SoftAX#show techsupport

============= Clock Info ===================
*09:59:22 JST 月  4月 29 2013

============= Version Info =================
AX Series Advanced Traffic Manager AXSoftAX
  Copyright 2007-2012 by A10 Networks, Inc.  All A10 Networks products are
  protected by one or more of the following US patents and patents pending:
  7716378, 7675854, 7647635, 7552126, 20090049537, 20080229418, 20080040789,
  20070283429, 20070271598, 20070180101
....
show techsuport exportコマンドでftpなどに保存することも可能です。
SoftAX#show techsupport export ?
  use-mgmt-port  Use management port as source port
  tftp:          Remote file path of tftp: file system(Format: tftp://host/file)
  ftp:           Remote file path of ftp: file system(Format:
                 ftp://[user@]host[:port]/file)
  scp:           Remote file path of scp: file system(Format:
                 scp://[user@]host/file)
  rcp:           Remote file path of rcp: file system(Format:
                 rcp://[user@]host/file)
  sftp:          Remote file path of sftp: file system(Format:
                 sftp://[user@]host/file)
バックアップ
コンフィグのバックアップ
コンフィグのバックアップを取得するには backup systemコマンドを使います。 バックアップにはSSL証明書、秘密鍵等の情報も含まれます。
SoftAX#backup system use-mgmt-port ftp://192.168.100.20/config.tar.gz
User name []?hoge
Password []?

.0 minutes 1 seconds
System files backup succeeded
ログファイルのバックアップ
ログファイルをバックアップするには backup logコマンドを使います。 AXシリーズでは定期的にtechsupportを取得しており(デフォルトだと15分おき)、techsupportの結果も取得できます。
SoftAX#backup log use-mgmt-port ftp://192.168.100.20/log.tar.gz
User name []?hoge
Password []?

.0 minutes 1 seconds
Log files backup succeeded
コンフィグのリストア
restoreコマンドでバックアップしたコンフィグからリストアできます。
SoftAX(config)#restore use-mgmt-port ftp://192.168.100.20/config.tar.gz
User name []?hoge
Password []?

.0 minutes 1 seconds
System files successful restored
とりあえずはこんなところで。
SoftAXで遊んでみる
仕事でA10 NetworksのAXシリーズを使う機会があったので仮想アプライアンス版のSoftAXで遊んでみます。
トライアル版では30日の使用制限と5Mbpsの帯域制限がありますが、軽く遊ぶ程度なら十分だと思われます。
SoftAX Virtual ADC: Software-based Application Delivery Controller
下記のページで必要な事項を入れてすこし待つとダウンロード用とライセンス発行用のアドレスが記載されたメールが届くのでアクセスしてください。
仮想アプライアンスはVMware ESX/ESXi 4.0以降用となっているのでうまいことインストールします。
イメージを変換すればVMware Workstationなんかでも動くみたいです。
初期設定
インストール直後は下記の通り設定されていますが、環境に合わせて変更する必要があります。
| IPアドレス | 172.31.31.31 /24 |
| ユーザ名 | admin |
| パスワード | a10 |
| enableパスワード | (ブランク) |
初期設定に必要なコマンド類はSoftAX Installation Guide(ライセンスのメールに記載されています)を読めばわかるようになっているので、うまいことやってください。
コマンド体系はほとんどCiscoのIOSと同じで、CiscoのL3スイッチやルータを触ったことがある人は取っ付きやすいと思います。
AX system is ready now.

[type ? for help]

SoftAX>enable
Password:
SoftAX#configure terminal
SoftAX(config)#interface management
SoftAX(config-if:management)#ip address 192.168.100.50 /24
SoftAX(config-if:management)#ip default-gateway 192.168.100.1
SoftAX(config-if:management)#end
SoftAX#write memory
Building configuration...
Write configuration to default startup-config
SoftAX#
SoftAX#show running-config interfaces management
interface management
 ip address 192.168.100.50 255.255.255.0
 ip default-gateway 192.168.100.1
!
あとはライセンスのインポートをして終了です。
続きは気が向いたら書きます('A`)
OMDを使った監視サーバ構築(前編)
OMD(Open Monitoring Distribution)]を使って監視サーバを構築してみます。
Open Monitoring Distribution - Wiki - OMD
OMDってなに?
こちらは公式サイトからの引用です。
Welcome to OMD - the Open Monitoring Distribution. OMD implements a completely new concept of how to install, maintain and update a monitoring system built on Nagios.
OMD avoids the tedious work of manually compiling and integrating Nagios addons while at the same time avoiding the problems of pre-packaged installations coming with your Linux distribution, which are most times outdated and provide no regular updates.
Nagiosとそのアドオンを用いた監視システムを構築するためのディストリビューションで、2012/07現在、下記のソフトウェアで構成されます。
- nagios
- nagios-plugins
- nsca
- check_nrpe
- Icinga
- Shinken
- nagvis
- pnp4nagios
- rrdtool/rrdcached
- Check_MK
- MK Livestatus
- Multisite
- dokuwiki
- Thruk
- Mod-Gearman
- check_logfiles
- check_oracle_health
- check_mysql_health
- jmx4perl
- check_webinject
- check_multi
OMDを使うと面倒な設定をせずに監視サーバの初期構築ができて便利です。
ソフトウェアのバージョンアップもOMDに任せることができます。
インストール方法
Debian, Ubuntu, CentOS, RedHat, Suseではレポジトリからインストールすることが可能です。
OMD Repository – ConSol* Labs
CentOS 6の場合はこんな感じで実行します。
$ sudo sh -c "wget -O - http://labs.consol.de/OMD/rh60/stable/omd.repo > /etc/yum.repos.d/omd.repo"
$ sudo yum install omd-0.54
サイト作成
実際に監視サーバを作成してみます。(OMDでは site とよびます)
$ sudo omd create hoge
Adding /omd/sites/hoge/tmp to /etc/fstab.
Creating temporary filesystem /omd/sites/hoge/tmp...OK
Created new site hoge with version 0.54.

  The site can be started with omd start hoge.
  The default web UI is available at http://example.com/hoge/
  The admin user for the web applications is omdadmin with password omd.
  Please do a su - hoge for administration of this site.
これで hoge ユーザが作成され、監視システム構築の準備が整いました。
今後は hoge ユーザにスイッチして作業を進めます。
OMDの使い方
基本的には作成したサイトのユーザにスイッチしてから omd コマンドで各種命令を実行します。
OMD[hoge]:~$ omd help
Usage (called as site user):

 omd help                        Show general help
 omd version    [SITE]           Show version of OMD
 omd versions                    List installed OMD versions
 omd sites                       Show list of sites
 omd update                      Update site to other version of OMD
 omd start      [SERVICE]        Start services of one or all sites
 omd stop       [SERVICE]        Stop services of site(s)
 omd restart    [SERVICE]        Restart services of site(s)
 omd reload     [SERVICE]        Reload services of site(s)
 omd status     [SERVICE]        Show status of services of site(s)
 omd config     ...              Show and set site configuration parameters
 omd diff       ([RELBASE])      Shows differences compared to the original version files
 omd umount                      Umount ramdisk volumes of site(s)

General Options:
 -V <version>                    set specific version, useful in combination with update/create
 omd COMMAND -h, --help          show available options of COMMAND
- 特定のユーザにスイッチした場合はそのサイトだけ影響を受けます
- rootユーザの場合、すべてのサイトのサービスをいっぺんに操作できます
- ただし、すべてのコマンドが実行できるわけではありません(たとえばconfig, diffなどは不可)
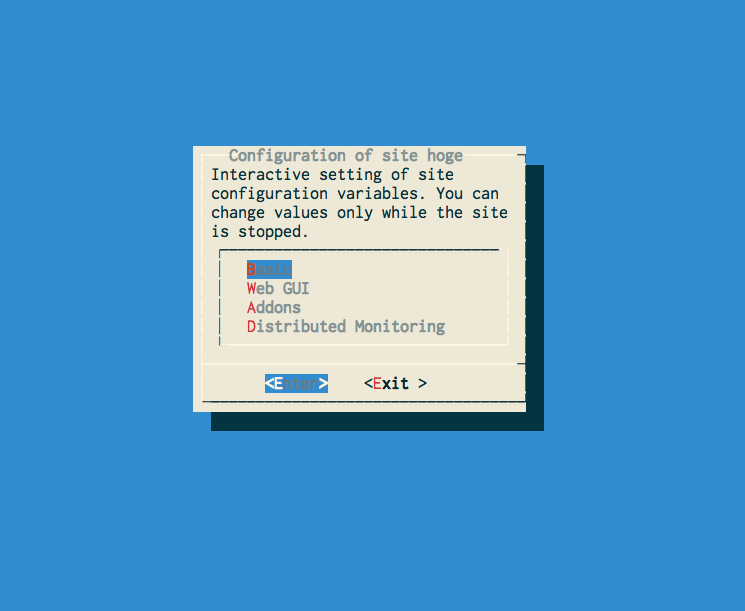
OMDの設定変更
$ omd config
を実行することでOMD自体の設定ができます。
なお、設定を変更する際にいったんそのサイトのサービスが止まるので気をつけてください。

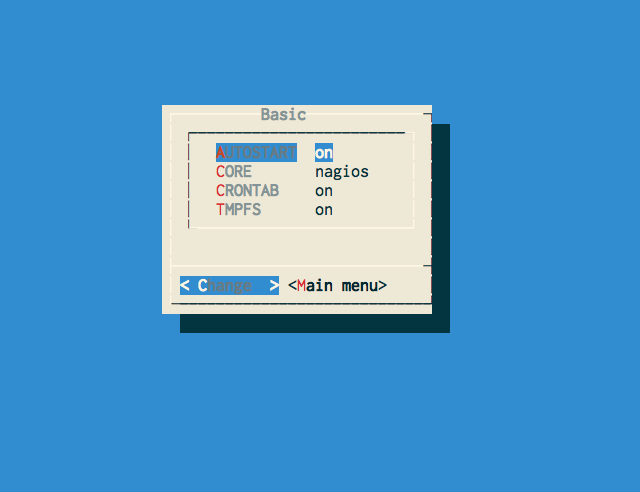
Basic

- AUTOSTART
ONにするとOMDが起動する時にそのサイトも起動させることができます。
- CORE
利用する監視システムを指定する。
Nagios, Icinga, Shinkenからお好みで。
- CRONTAB
サイト固有のcrontabを有効にする場合ONにする。
- TMPFS
テンポラリファイルのためにラムディスクを利用する場合ONにする。
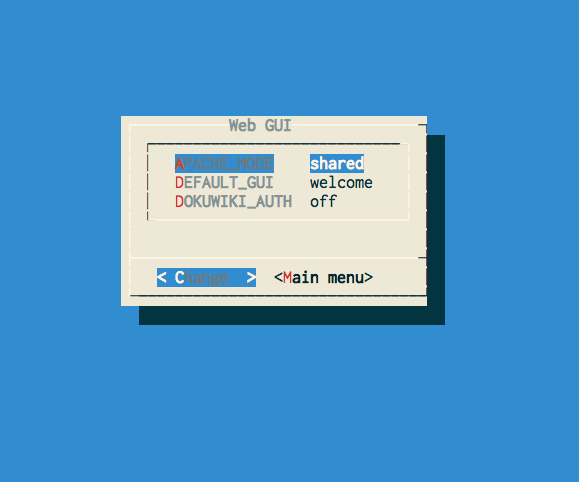
Web GUI

- APACHE_MODE
Apacheをサイトごとに個別に起動させる、システムのApacheを利用する、Webサーバを利用しないの3つから選択する。
- DEFAULT_GUI
サイトのWebページにアクセスした際にデフォルトで表示させるGUIを選択する。
Nagios, Icingaなどなどお好みで。
- DOKUWIKI_AUTH
ユーザ管理にDokuwikiを使う場合にONにする。
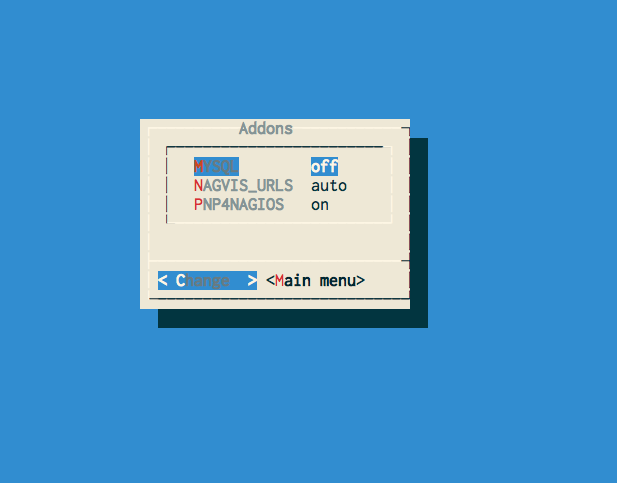
Addons

MySQLを使うアドオンで、サイトごとに別々のMySQLを起動させたい場合ONにする。
- NAGVIS_URLS
NagVisとリンクさせるGUIを選択する。
- PNP4NAGIOS
パフォーマンスデータの処理にPNP4Nagiosを利用する場合ONにする。
PNP4Nagiosは取得したデータをもとにグラフを作ってくれます。
Distributed Monitoring

- LIVESTATUS_TCP
- MOD_GEARMAN
- NSCA
それぞれ利用したい場合はONにする。
これで監視サーバの構築が終わりました。
次回は実際に設定追加等をやってみます。
